Classification tutorial (EMPIAR-10304)
This tutorial shows how to convert raw tilt-series from EMPIAR-10304 (E. coli. ribosomes) into a ~4.9A resolution structure and resolve 8 different conformations.
Total running time required to complete this tutorial: 20 hrs.
Pre-calculated results are available in the demo instance of nextPYP.
We first use the command line to download and decompress a tbz file containing: 1) a script to download the raw tilt-series from EMPIAR, 2) corresponding metadata with tilt angles and acquisition order, and 3) an initial model:
# cd to a location in the shared file system and run:

wget https://nextpyp.app/files/data/nextpyp_class_tutorial.tbz
tar xfz nextpyp_class_tutorial.tbz
source download_10304.sh
Note
Depending on the speed of your network connection, downloading the raw data from EMPIAR can take several minutes.
Open your browser and navigate to the url of your nextPYP instance (e.g., https://nextpyp.myorganization.org).
Step 1: Create a new project
Data processing runs are organized into projects. We will create a new project for this tutorial
The first time you login into
nextPYP, you should see an empty Dashboard:
Click on Create new project, give the project a name, and select Create
Select the new project from the Dashboard and click Open
The newly created project will be empty and a Jobs panel will appear on the right
Step 2: Import raw tilt-series
Import the raw tilt-series downloaded above ( <1 min)
Go to Import Data and select Tomography (from Raw Data)

A form to enter parameters will appear:
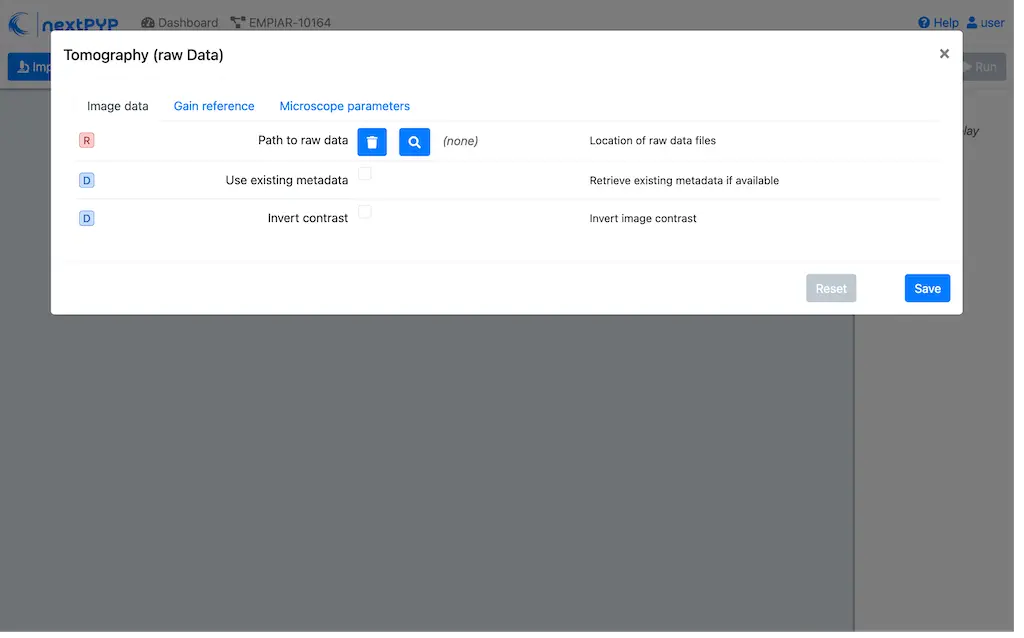
Go to the Raw data tab:
Set the
Locationof the raw data by clicking on the icon and browsing to the directory where the you downloaded the raw movie framesType
tilt*.mrcin the filter box (lower right) and click on the icon to verify your selection. 12 matches should be displayedClick Choose File Pattern to save your selection
Click on the Microscope parameters tab
Set
Pixel size (A)to 2.1Set
Acceleration voltage (kV)to 300
Click Save and the new block will appear on the project page
The block is in the modified state (indicated by the sign) and is ready to be executed
Clicking the button Run will show another dialog where you can select which blocks to run:
Since there is only one block available, simply click on Start Run for 1 block. This will launch a process that reads one tilt image, applies the gain reference (if applicable) and displays the resulting image inside the block
Click inside the block to see a larger version of the image
Step 3: Pre-processing
4 min - Movie frame alignment, CTF estimation and tomogram reconstruction
Click on
Tilt-series(output of the Tomography (from Raw Data) block) and select Pre-processingGo to the Frame alignment tab:
Check
No movie framesClick on the CTF determination tab
Set
Max resolutionto 5.0Click on the Tilt-series alignment tab
Uncheck
Resize squares to closest multiple of 512Click on the Tomogram reconstruction tab
Set
Thickness of reconstruction (unbinned voxels)to 3072Set
Binning factor for reconstructionto 12Check
Erase fiducialsClick on the Resources tab
Set
Split, Threadsto 11Set other runtime parameters as needed (see Computing resources)
Click Save, Run, and Start Run for 1 block. Follow the status of the run in the Jobs panel
Step 4: Particle picking
Particle detection from tomograms ( 2 min)
Click on
Tomograms(output of the Pre-processing block) and select Particle pickingGo to the Particle detection tab:
Set
Detection methodto size-basedSet
Particle radius (A)to 80Set
Threshold for contamination detectionto 2.0Set
Minimum contamination size (voxels)to 60Set
Minimum distance between particlesto 2Check
Local refinementSet
Z-axis detection range (binned slices)to 40Set
Particle detection thresholdto 2
Click Save, Run, and Start Run for 1 block
Navigate to the Particle picking block to inspect the coordinates
Note
In this tutorial, we use the size-based method for particle detection. Other methods are available, including manual, geometry-based, and neural network-based picking, and molecular pattern mining.
Step 5: Reference-based refinement
Reference-based particle alignment ( 14 hr)
Click on
Particles(output of the Particle picking block) and select Reference-based refinementGo to the Sample tab:
Set
Molecular weight (kDa)to 2000Set
Particle radius (A)to 150Click on the Particle extraction tab
Set
Box size (pixels)to 64Set
Image binningto 4Uncheck
Skip gold fiducialsCheck
Invert CTF handednessClick on the Particle scoring function tab
Set
First tilt for refinementto 15Set
Last tilt for refinementto 25Set
Max resolution (A)to 22.0Click on the Reference-based refinement tab
Specify the location of the
Initial model (*.mrc)by clicking on the icon , navigating to the folder where you downloaded the data for the tutorial, and selecting the file EMPIAR-10304_init_ref.mrcSet
Particle rotation Phi range (degrees),Particle rotation Psi range (degrees)andParticle rotation Theta range (degrees)`to 180Set
Rotation step (degrees)to 6.0Set
Particle translation range (A)to 50Click on the Reconstruction tab
Check
Show advanced optionsSet
Max tilt-angle (degrees)to 50Set
Min tilt-angle (degrees)to -50Click on the Resources tab
Set
Split, Threadsto the maximum allowable by your system
Save your changes, click Run and Start Run for 1 block
One round of refinement and reconstruction will be executed. Click inside the block to see the results
Step 6. Filter particles
Identify duplicates and particles with low alignment scores ( 3 min)
Click on
Particles(output of the Reference-based refinement block) and select Particle filteringGo to the Particle filtering tab:
Specify the location of
Input parameter file (*.bz2)by clicking on the icon and selecting the file tomo-reference-refinement-*_r01_02.bz2Set
Score thresholdto 15Set
Min distance between particles (unbinned pixels/voxels)to 20Set
Lowest tilt-angle (degrees)to -7Set
Highest tilt-angle (degrees)to 7Check
Generate reconstruction after filteringCheck
Permanently remove particles
Click Save, Run, and Start Run for 1 block. You can see how many particles were left after filtering by looking at the job logs.
Step 7. Fully constrained refinement
Tilt-geometry parameters and particle poses are refined in this step ( 10 min)
Click on
Particles(output of the Particle filtering block) and select 3D refinementGo to the Particle extraction tab:
Set
Box size (pixels)to 256Set
Image binningto 1Click on the Particle scoring function tab
Set
Max resolution (A)to 18:14Click on the Refinement tab
Select the location of the
Initial parameter file (*.bz2)by clicking on the icon and selecting the filetomo-fine-refinement-*_r01_clean.bz2Set
Last iterationto 3Check
Refine tilt-geometryCheck
Refine particle alignmentsSet
Particle translation range (A)to 30.0Click on the Reconstruction tab
Check
Apply dose weightingCheck
Global weights
Click Save, Run, and Start Run for 1 block to execute three rounds of refinement and reconstruction
Click inside the 3D refinement block to inspect the results
Step 8: Create shape mask
Use most recent reconstruction to create a shape mask ( <1 min)
Click on
Particles(output of 3D refinement block) and select MaskingGo to the Masking tab:
Select the
Input map (*.mrc)by click on the icon and selecting the file tomo-new-coarse-refinement-*_r01_03.mrcSet
Threshold for binarizationto 0.4Set
Width of cosine edge (pixels)to 8
Click Save, Run, and Start Run for 1 block to run the job
Click on the menu icon of the Masking block, select the Show Filesystem Location option, and Copy the location of the block in the filesystem (we will use this in the next step))
Click inside the Masking block to inspect the results of masking
Step 9. Region-based local refinement
Constraints of the tilt-geometry are applied over local regions ( 25 min)
Click on
Particles(output of 3D refinement block) and select 3D refinementGo to the Particle scoring function tab:
Set
First tilt for refinementto 18Set
Last tilt for refinementto 22Set
Max resolution (A)to 18:14:12:10:8:6:5Set
Masking strategyto from fileSpecify the location of the
Shape mask (*.mrc)produced in Step 9 by clicking on the icon , navigating to the location of the Masking block by copying the path we saved above, and selecting the file frealign/maps/mask.mrcClick on the Refinement tab
Select the location of the
Initial parameter file (*.bz2)by clicking on the icon and selecting the filetomo-new-coarse-refinement-*_r01_03.bz2Set
Last iterationto 5Set
Number of regionsto 8,8,2
Click Save, Run, and Start Run for 1 block to run the job
Click inside the 3D refinement block to inspect the results
Step 10: Particle-based CTF refinement
Per-particle CTF refinement using most recent reconstruction ( 2 hr)
Click on
Particles(output of 3D refinement block) and select 3D refinementGo to the Particle scoring function tab:
Set
First tilt for refinementto 15Set
Last tilt for refinementto 25Set
Max resolution (A)to 4.5Click on the Refinement tab
Select the location of the
Initial parameter file (*.bz2)by clicking on the icon and selecting the filetomo-new-coarse-refinement-*_r01_05.bz2Uncheck
Refine tilt-geometryUncheck
Refine particle alignmentsCheck
Refine CTF per-particleSet
Defocus 1 range (A)andDefocus 2 range (A)to 2000.0
Click Save, Run, and Start Run for 1 block
Click inside the 3D refinement block to inspect the results
Step 11: Region-based refinement after CTF refinement
Constraints of the tilt-geometry are applied over local regions ( 20 min)
Click on
Particles(output of 3D refinement block) and select 3D refinementGo to the Particle scoring function tab:
Set
First tilt for refinementto 18Set
Last tilt for refinementto 22Set
Max resolution (A)to 18:14:12:10:8:6:5:4.5:6:5:4.5Click on the Refinement tab
Select the location of the
Initial parameter file (*.bz2)by clicking on the icon and selecting the filetomo-new-coarse-refinement-*_r01_02.bz2Set
Last iterationto 12Check
Refine tilt-geometryCheck
Refine particle alignmentsUncheck
Refine CTF per-particleSet
Number of regionsto 16,16,4Set
Optimizer - Max step lengthto 20.0Click on the Reconstruction tab
Set
Frame weight fractionto 2
Click Save, Run, and Start Run for 1 block to run the job
Click inside the 3D refinement block to inspect the results
Step 12: 3D classification
Constrained classification ( 3 hr)
Click on
Particles(output of the Particle refinement block) and select 3D classificationGo to the Classification tab:
Select the location of the
Initial parameter file (*.bz2)by clicking on the icon and selecting the file tomo-new-coarse-refinement-*_r01_02.bz2Set
Last iterationto 20Set
Number of classesto 8Uncheck
Refine particle alignmentsClick on the Reconstruction tab
Specify the location of the
External weightsby clicking on the icon and selecting the filefrealign/weights/global_weight.txtfrom the file location of the previous block
Click Save, Run, and Start Run for 1 block
Click inside the 3D classification block to inspect the results
Tip
Click on the round blue markers (top right of the page) to inspect different classes or go to the Class view or Classes Movie tabs to show all classes simultaneously
Info
Running times were measured running all tilt-series in parallel on nodes with 124 vCPUs, 720GB RAM, and 3TB of local SSDs