Compute resources
nextPYP can be run on either a Desktop workstation or a Compute cluster. A Desktop workstation is simpler to setup and can be used to process small to medium sized datasets. For most datasets, however, a compute cluster will enable significantly faster processing.
nextPYP autmatically detects what resources are installed locally in the server (number of CPU cores and GPU cards) and allocates jobs accordingly. No additional configuration is needed.
In this mode, resources are managed by the SLURM scheduler. Commonly managed resources include CPU threads, RAM, GPUs, and local scratch space.
Resource management
The execution of most blocks in nextPYP involves three main phases:
Launch: Typically a lightweigth job used to initiate data processing.
Split: Multiple jobs that are executed in parallel (typically one job for each micrograph/tilt-series).
Merge: A job that consolidates the results from the Split phase (such as combining intermediate data to generate a single 3D reconstruction).
Because each phase has distinct computational requirements, resources (i.e., number of threads, memory, etc.) are specified independently for each phase.
Tip
Real time information about jobs is available in the Jobs panel.
Resource allocation
Each processing block in nextPYP includes a Resources tab where resources for each phase can be allocated.
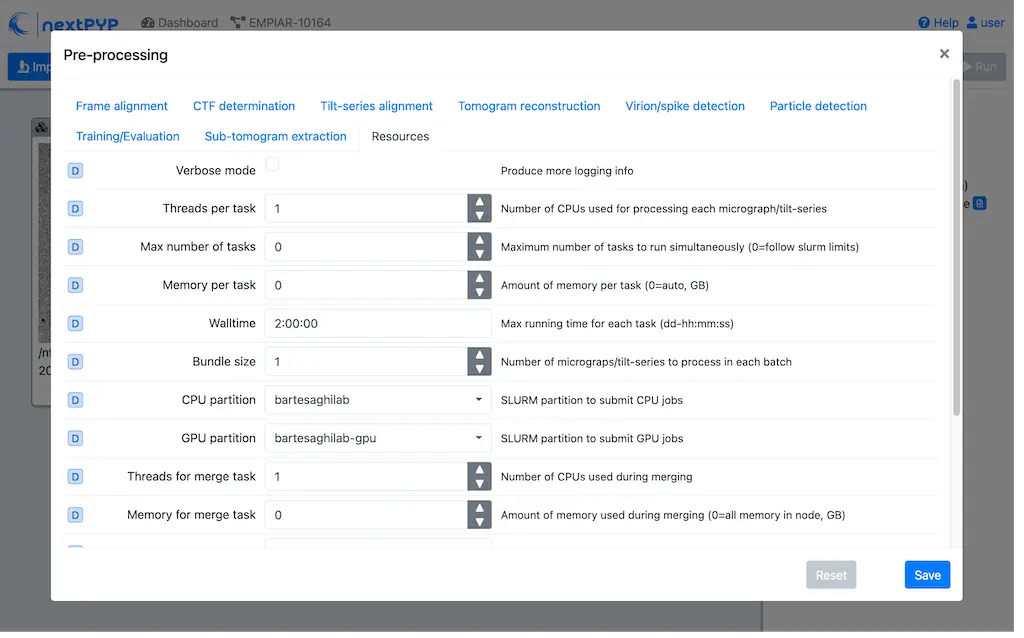
The Resources tab is divided into three sections, one for each phase:
Launch task
- Launch, Threads
Number of threads used when launching jobs.
Default: 1
- Launch, Memory per thread (GB)
Amount of memory per thread requested when launching jobs.
Default: 4
- Launch, Walltime (dd-hh:mm:ss)
Set a limit on the total run time when launching jobs. When the time limit is reached, SLURM will terminate the job.
Default: 1-00:00:00
- Split, Gres
List of Generic resources (Gres) to request for the split job. This option can be used to request specific resources available in your SLURM instance, for example,
lscratch:500,shrd=64`, which requests 500 GB of local scratch space and 64 GB of shared memory. Thelscratchresource is typically used for temporary storage, while theshrdresource is used for shared memory. To check the available resources in your SLURM instance, run the command:sinfo -o "%100N %30G". If you are unsure about this, please contact your system administrator.Default: None
Split task
- Split, Threads
Number of threads used to process a micrograph or tilt-series.
Default: 1
- Split, Total threads
Maximum number of threads to run simultaneously. Setting it to
0removes any limits, deferring entirely to SLURM’s limits. This option can help manage how resources are distributed between multiplenextPYPjobs. For example, if the number of threads is set to 7 and the total number of threads is set to 21, then 3 jobs will be run simultaneously, each using 7 threads. If the total number of threads is set to0, then SLURM will determine how many jobs to run simultaneously based on the available resources and any account quotas.Default: 0
- Split, Memory per thread (GB)
Amount of memory per thread requested for each split task.
Default: 4
- Split, Walltime (dd-hh:mm:ss)
Set a limit on the total run time for each split task. When the time limit is reached, SLURM will terminate the job.
Default: 1-00:00:00
- Split, Bundle size
Number of tasks to group into a bundle. Tasks within a bundle are processed one after the other, sequentially. For example, if there are 100 tasks and the bundle size is set to 10, then 10 jobs with 10 tasks each will be processed in parallel. This option can help manage how resources are distributed and potentially reduce storage utilization.
Default: 1
- Split, Gres
List of Generic resources (Gres) to request for the split job.
Default: None
Merge task
- Merge, Threads
Number of threads used to run the merge task.
Default: 1
- Merge, Memory per thread (GB)
Amount of memory per thread used to run the merge task.
Default: 4
- Merge, Walltime (dd-hh:mm:ss)
Set a limit on the total run time for the merge task. When the time limit is reached, SLURM will terminate the job.
Default: 1-00:00:00
- Split, Gres
List of Generic resources (Gres) to request for the merge task.
Default: None
Warning
Users are responsible for ensuring that the requested combination of resources is available in the HPC environment where nextPYP is running. If the requested resource combination is unavailable, the job will be left in a PENDING state, potentially indefinitely. To fix this, users can cancel the job and resubmit it with a different combination of resources.
Tip
To check the status of a job, go to the Jobs panel, click on the icon next to the job, and select the Launch tab.
GPU resources
Although the core functionality of nextPYP operates exclusively on CPUs, certain operations do require GPU access. In most cases, users cannot choose between running jobs on CPUs or GPUs, this is determined by the specific requirements of each job. Only a few exceptions exist, and in those cases, a checkbox will be available to enable or disable GPU usage.
List of programs and operations that require GPUs:
Particle picking: Neural network-based article picking (training and inference)
MiLoPYP: Cellular pattern mining and localization (training and inference)
MotionCor3: Motion correction of micrographs or tilt movies
AreTomo2: Tilt-series alignment and tomographic reconstruction
Membrain-seg: Tomogram segmentation using pre-trained neural networks
Topaz: Tomogram denoising using pre-trained neural networks
IsoNet: Tomogram denoising using neural networks (training and inference)
CryoCARE: Tomogram denoising using neural networks (training and inference)
Pytom-match-pick: Particle picking using template matching
tomoDRGN: Heterogeneity analysis using neural networks (training and inference)
Jobs that use any of the above programs will run using 1 GPU by default. You don’t need to set any additional parameters to enable GPUs for these jobs.
Jobs that use any of the above programs will be submitted to the SLURM scheduler using the --gres=gpu:1 option. This means that one GPU will be requested for each job.
To run a job on a specific GPU resource, users can set the Split, Gres parameter in the Resources tab of a block. For example, to use an H100 card, set Split, Gres to gpu:H100:1.
Note
For this to work, your SLURM instance must have a generic resource (Gres) named H100 defined. To check the available resources in your SLURM instance, run the command: sinfo -o "%100N %30G". If you are unsure about this, please contact your system administrator.
Multiple GPUs
Some of the programs listed above (e.g., IsoNet) support multi-GPU execution.
To allocate more than one GPU for a job, set the Split, Gres option to gpu:n
where n is the number of GPUs you want to request, for example, gpu:2.
Troubleshooting GPU issues
How many GPUs are available to nextPYP in my workstation computer?
nextPYP can automatically detect available GPUs in your computer if they are NVidia Cuda-capable GPUs.
Currently, no other GPU types (including AMD or Intel GPUs) are supported.
To see how many GPUs were detected by nextPYP, head to the administration page
in your web browser and navigate to the “Standalone Jobs” tab. At the top of that tab is a “Resources” section
that shows the total number of GPUs detected, as well as how many are currently being used, or available for use.
Alternatively, nextPYP prints GPU diagnostic information to the website log file during startup.
Find the <local>/logs/micromon log file in your filesystem,
where <local> is the web.localDir path defined in your config.toml file.
A link to the config.toml file can be found in your installation folder.
During startup, nextPYP will print the number of automatically-detected GPUs to the log file.
Look for a section like this:
[standalone]
     available cpus:  2
   available memory:  6 GiB
     available gpus:  1
You can find the number of GPUs that were detected in the available gpus line in the log.
Launched GPU jobs get stuck waiting for resources on my workstation computer
Does your GPU-enabled job get stuck waiting to start with the following reason:
The job is waiting for more resources to become available
but you know no other jobs are using your GPUs? It’s possible nextPYP failed to detect your GPUs correctly.
nextPYP should automatically detect your machine’s NVidia GPUs and make them available for jobs,
but sometimes this automatic detection can fail. For example, sometimes NVidia GPUs may not be detectable
until we update our detection software to match NVidia’s newest releases. If you have AMD or Intel GPUs though,
those aren’t currently supported by nextPYP.
First, see how many GPUs nextPYP was able to detect.
If you know your machine has NVidia GPUs, but nextPYP only detected zero GPUs,
then the GPUs could not automatically be detected by our software.
To see what went wrong with automatic detection, you can look for errors in the website log file.
Find the <local>/logs/micromon log file in your filesystem,
where <local> is the web.localDir path defined in your config.toml file.
A link to the config.toml file can be found in your installation folder.
Try searching for a line in the log file like this one:
Failed to count CUDA GPUs, assuming no GPUs
If you find that line in your log, it means nextPYP definitely failed to automatically detect your GPUs.
There should also be a more detailed error message directly after this line in the log.
Feel free to send us the detailed error message so we can tell what went wrong and hopefully fix the issue
in a newer release of nextPYP.
The most common reason for detection failure at this step is your computer may have a newer NVidia driver that breaks compatibility with the older NVidia runtime libraries used by our detection software.
Even though automatic detection failed, you can still configure your number of GPUs manually
by editing the config.toml file. Under the [standalone] section, add a line that looks like this:
availableGpus = 4
If the comfig.toml file doesn’t yet have a [standalone] section, add a new one to the bottom of the file.
If the number of NVidia GPUs you have is 4, then you’re all set.
Otherwise, change the 4 to the number of NVidia GPUs you have.
When you’re done, the bottom of your config.toml file should look something like this:
[standalone]
availableGpus = 4
After making changes to your config.toml file, restart nextPYP to apply the changes.
Then, check the total number of GPUs available to nextPYP again. If you see more tham one GPU there, then the next time you run a GPU-enabled job, it shouldn’t get stuck waiting for resources anymore.