Installation
Contents
Installation
Supported operating systems
nextPYP has been tested and works on the following operating systems:
The application can be run in Standalone mode or using an HPC cluster.
Step 1: Prerequisites for installation on a cluster
- Website:
nextPYPuses a web server as the main interface, so the machine where you installnextPYPshould be visible on your network. Additionally, if the website should be available on the public internet, then the machine should be connected to the public internet and should have a registered domain name.
- SLURM Cluster:
nextPYPuses a SLURM compute cluster to do the data processing. The login node of the SLURM cluster must be reachable on the network from the machine wherenextPYPwill be installed.
- Shared filesystem:
nextPYPrequires that the web server and the SLURM cluster share a single filesystem (e.g. an NFS storage system) and it be mounted at the same mount point on every machine. For example, if the shared filesystem is mounted on the SLURM cluster nodes as/nfs/data, then those files should also be available on the web server machine as/nfs/data.
- Service account:
nextPYPrequires a service account to both run the web server process, and access files on the shared filesystem. This user should be the same on the web server machine and the SLURM cluster. Because this user account runs the web server on the web server machine (which may be exposed to the public internet), the service account should not have administrative privileges.
- Paswordless SSH access to the SLURM login node:
The service account needs to have login access from the web server to the SLURM node via SSH without a password. This will require installing the public SSH key for the service account into the login system for the SLURM node. For a stock linux installation of sshd, that usually means copying the public key into a file like /home/account/.ssh/authorized_keys. But for SLURM clusters with a networked login system or SSO, you’ll need to consult your organization’s IT staff for SSH key installation instructions.
Step 2: Install operating system packages
The only packages needed are Apptainer (formerly Singularity) and wget. Instructions for installing
then vary by operating system.
Before installing the packages, you will need first to enable the EPEL repository, if it was not enabled already:
sudo dnf install -y epel-release
Then you can install the packages:
sudo dnf install -y apptainer wget
Install wget:
sudo apt-get install -y wget
Download debian package for Apptainer:
wget https://github.com/apptainer/apptainer/releases/download/v1.1.0-rc.2/apptainer_1.1.0-rc.2_amd64.deb
Install Apptainer:
sudo apt-get install -y ./apptainer_1.1.0-rc.2_amd64.deb
Step 3: Download and run the installation script
First, create the folder where nextPYP will be installed. This folder must be on the shared
filesystem (unless you are installing in Standalone mode). If you mounted the shared filesystem at e.g. /nfs/data/, then create a folder
called something like /nfs/data/apps/nextPYP.
Then, log into the web server machine with a user account that has administrator privileges and navigate to the app folder you just created.
cd "/nfs/data/apps/nextPYP"
Then, choose which version of nextPYP you want to install.
Then, download the installation script for that version. Assuming you chose “latest”, run:
wget https://nextpyp.app/files/pyp/latest/install
chmod u+x install
Feel free to inspect the installation script. It’s fairly simple. Once you’re confident that
it does what you want, run it with administrator privileges. You’ll need to supply the name
of the service account as the $PYP_USER environment variable and the domain name for the web
server as the $PYP_DOMAIN environment variable. If the web server will not be connected to the
public internet, you can choose localhost or an IPv4 address instead of a domain name. If
$PYP_DOMAIN is not set, the installer will default to the value of the command hostname.
sudo PYP_USER=nextpyp PYP_DOMAIN=nextpyp.myorganization.org ./install
If the installer gives an error like $username is apparently not a valid group, then you’ll
need to set the group for the service account too, using the $PYP_GROUP environment variable:
sudo PYP_USER=nextpyp PYP_GROUP=services PYP_DOMAIN=nextpyp.myorganization.org ./install
After the installation finishes (it should not take more than a couple of minutes), nextPYP is almost ready to use.
All that’s left is to confirm (or modify) the configuration file.
Step 4: Review configuration
The installer created a default configuration file at config.toml in the installation folder.
This file is written in the TOML format.
The installer did its best to guess the correct configuration options for your environment, but almost certainly there are some settings that need review.
In particular, the slurm.host setting should be the hostname or address of the SLURM login node,
but by default the installer chooses the domain name you picked as the value. If you happened to
install nextPYP on the SLURM login node, then congratulations! This setting is correct for you.
If nextPYP is installed on another machine instead, then be sure to correct the value to the real
SLURM login node.
Feel free to review any other configuration settings as well. The default configuration file has a few comments to describe the settings configured there, but you can find more information in the full documentation for the configuration file.
Note
To run nextPYP in Standalone mode, make sure there [slurm] section in the configuration file is removed.
In this mode, the web server and the data processing are all run locally.
Although the default options should serve you well in standalone mode, if you want to customize anything,
you can add the [standalone] section to your config file.
See the full documentation for standalone mode configuration.
Step 5 (recommended): Configure access to system resources
Configure how to access system resources by specifying the following parameters:
pyp.scratchDirectory for large (multi-GB) temporary files on the compute nodes. This location should have fast read/write speeds, ideally in local storage.
pyp.bindsSince
PYPruns inside of a Singularity/Apptainer container, by default, no files from outside of the container will be visible toPYP. To make files visible toPYP, bind the directories containing those files into the container.
slurm.path(SLURM mode only)Path to the SLURM binaries on the login node.
slurm.queues(SLURM mode only)The names of any SLURM partitions to which users can submit
nextPYPjobs.
slurm.gpuQueues(SLURM mode only)The names of any SLURM partitions with GPU hardware to which users can submit
nextPYPjobs.
Here is an example of how to specify these options in the configuration file:
[pyp]

scratch = '/scratch/nextPYP'
binds = [ '/nfs', '/cifs' ]

[slurm]

path = '/opt/slurm/bin'
queues = [ 'general', 'quick' ]
gpuQueue = [ 'gpu' ]
Step 6 (optional): Improve performance by using a local filesystem
By default, the installer installs everything to the shared filesystem. However, some files don’t
actually need to be shared with the SLURM cluster, and would benefit from using faster machine-local
storage, if it is available. If your web server machine has fast local storage available with plenty
of free space, consider moving the local folder there.
If your fast local storage is mounted at the filesystem root /, then maybe create a folder like
/home/pyp/nextPYP. If your fast local storage is mounted at /fast, then maybe create a folder
like /fast/nextPYP.
The installer created a local folder in the installation folder. If you installed your nextPYP to
/nfs/data/apps/nextPYP, then the local folder will be at /nfs/data/apps/nextPYP/local.
Just move the local folder to your new folder in the fast storage, e.g. /fast/nextPYP/local.
Finally, update the configuration file so nextPYP knows where to find the new folder, e.g.:
[web]
localDir = '/fast/nextPYP/local'
Step 7a (choose a or b): Automatically start nextPYP at boot
Note
If you intend to start and stop nextPYP directly on the command line, skip this section and go to step 7b.
The instructions to automatically start nextPYP at boot will depend on your operating system.
Operating systems that use systemd (including RHEL, CentOS, Rocky Linux):
Run the systemd installation script with sudo. Of course, feel free to inspect the script first.
The systemd installer needs the same environment variables you used with the main installation script (provide the correct value for PYP_GROUP if you needed that for the installation script):
sudo PYP_USER=nextpyp PYP_DOMAIN=nextpyp.myorganization.org ./install-systemd
Once finished, two new systemd services will be available, enabled, and running:
nextPYPThe main application server and database processes
nextPYP-rproxThe reverse proxy process, handles web security and HTTPs traffic
You can check on the status of the services, using the usual systemctl command. e.g.,
the command:
systemctl status nextPYP
should yield the response:
● nextPYP.service - nextPYP
   Loaded: loaded (/usr/lib/systemd/system/nextPYP.service; enabled; vendor preset: disabled)
   Active: active (running) since Thu 2022-08-11 10:14:57 EDT; 4h 5min ago
 Main PID: 2774 (starter-suid)
    Tasks: 91 (limit: 23650)
   Memory: 708.3M
   CGroup: /system.slice/nextPYP.service
           ├─2774 Singularity instance: nextpyp [nextPYP]
           ├─2775 sinit
           ├─2793 /bin/sh /.singularity.d/startscript
           ├─2796 /bin/sh /opt/micromon/init.sh
           ├─2802 /usr/bin/python2 /usr/bin/supervisord -c /etc/supervisor/supervisord.conf
           ├─2893 /bin/sh /opt/micromon/bin/micromon.sh
           ├─2894 /usr/bin/mongod --config /tmp/mongod.conf
           └─2895 java -Xmx2048M @bin/classpath.txt io.ktor.server.netty.EngineMain
and the command:
systemctl status nextPYP-rprox
should yield the response:
● nextPYP-rprox.service - nextPYP-rprox
   Loaded: loaded (/usr/lib/systemd/system/nextPYP-rprox.service; enabled; vendor preset: disabled)
   Active: active (running) since Thu 2022-08-11 10:14:58 EDT; 4h 8min ago
 Main PID: 2822 (starter)
    Tasks: 22 (limit: 23650)
   Memory: 114.6M
   CGroup: /system.slice/nextPYP-rprox.service
           ├─2822 Singularity instance: root [reverse-proxy]
           ├─2823 sinit
           └─2843 caddy run --config /var/www/reverse-proxy/Caddyfile
Step 7b (choose a or b) Manually start and stop nextPYP
Note
If you already configured systemd to start and stop services automatically, you can skip this section.
You can start and stop the servers manually with the installed nextpyp-* scripts.
There are two separate services needed to run nextPYP:
- Application Server:
The application server handles requests from your browser and runs the database for the app.
It is also an unprivileged process, to limit the damage caused by any kind of security compromise.
Start the application server with the
nextpyp-startscript. If you used different paths and usernames for your installation, be sure to modify the command to match your installation.sudo -u nextpyp PYP_CONFIG=/nfs/data/apps/nextPYP/config.toml nextpyp-startStop the application server with the
nextpyp-stopscript:sudo -u nextpyp nextpyp-stop
- Reverse Proxy Server:
The reverse proxy server acts as a gateway for the application server. It seamlessly enables HTTPs transport encryption for your connection so the application server can be securely accessed from the public internet.
Since the reverse proxy server uses the privileged HTTPs port 443, it must be started with root access.
Start the reverse proxy server with the
nextpyp-startrproxscript:sudo nextpyp-startrprox nextpyp.myorganization.orgNote
Be sure to use the same domain here that you chose during installation for the
$PYP_DOMAINenvironment variable. It can be your organization’s actual domain name,localhost, an IPv4 address, or even just the output of hostname. eg,`hostname`Stop the reverse proxy server with the
nextpyp-stoprproxscript:sudo nextpyp-stoprprox
Aside: Troubleshooting
Hopefully the services will start up perfectly and you can start using nextPYP right away.
If not, there are a few useful places to look for debugging information.
Console output
If you’re starting the services manually, the console output will be the first place to look for errors.
If you’re starting the services automatically with systemd, the console output is saved in the systemd logs.
You can access the systemd logs using the journalctl command and the name of the service:
sudo journalctl -u nextPYP
Note
journalctl shows the oldest part of the logs by default, but if you want to see newest part where recent
errors are most likely to appear, navigate to the end of the log using the page-down or end keys.
Log files
The various stages of service startup are written to log files in the local/logs sub-folder of your installation folder, eg /nfs/data/apps/nextPYP/local/logs.
init.logThis log records the output of the application server apptainer container startup. It’s the first process to run inside of the application server container and this log file should appear before any others. Errors here indicate that the apptainer container could not start successfully.
superdThis log records the output of
supervisord, the init system inside of the application server container. It runs afterinit.logand starts up the database and HTTP server procceses inside of the container. Errors here indicate that the database and HTTP servers may have failed to start.
mongod.logThis log records the output of the database, MongoDB. Errors here indicate that the database may be unable to operate successfully due to errors with the environment.
hostprocessorThis log records the output of the
hostprocessorprocess, a small shell script to help the application server launch processes outside of the apptainer container on the host OS. Thehostprocessoris mostly used by the application server to run jobs in standalone mode.
micromonThis log records the output of the HTTP server and the application itself. Every time the application is started, it will print useful diagnostic information to the log. This information can help verify that configuration values are being applied correctly. Errors here can indicate that the HTTP server and application failed to start, and that certain requests to the application resulted in server-side errors.
This log file is typically the last one to appear in the startup sequence. Its absence usually indicates that some earlier error (hopefully in one of the above logs) prevented the startup sequence from reaching this stage.
Step 8: First-time setup
Once your web server is up and running, point your browser to https://nextpyp.myorganization.org/#/admin, or whatever you chose for $PYP_DOMAIN. You should be greeted with a form like the following.
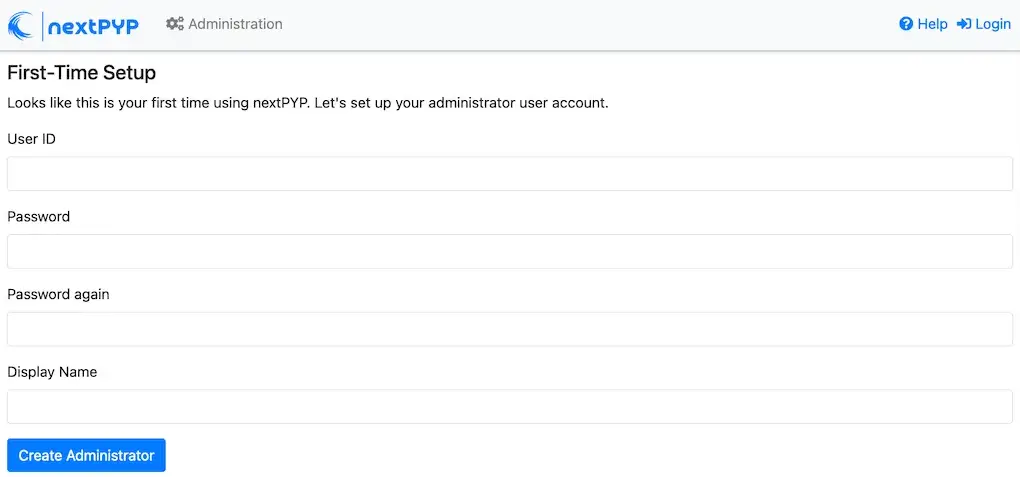
Fill out the form, click Create Administrator, and you’ll make the first administrator account.
Tip
See the Administration section for information on how to create and manage users and groups in nextPYP.